Laravel×Inertia×Vue3でCRUD機能を持つSPAを作ってみた

春雨に寒さを忘れる今日この頃、みなさまはいかがお過ごしでしょうか?
私は、相変わらずバックエンドとフロントエンドを行き来するせわしない日々を送っています。
今回は、LaravelとVue3の繋ぎ役としてSPAを作る際に良きに働いてくれるInertiaをご紹介します。
Inertiaとは
公式によると、
Inertia allows you to create fully client-side rendered, single-page apps, without the complexity that comes with modern SPAs. It does this by leveraging existing server-side patterns that you already love.
Inertia has no client-side routing, nor does it require an API. Simply build controllers and page views like you’ve always done! Inertia works great with any backend framework, but it’s fine-tuned for Laravel.
クライアントサイドでのルーティングがなく、APIも必要とせず、従来通りのコントローラーやページビューを作成するサーバーサイドのパターンを利用し、その上で、シングルページアプリケーション(SPA)によく見られる複雑さを避けながら、完全にクライアントサイドでレンダリングされるSPAを作成できる、
という感じでしょうか。
前提
- ubuntu v22.04
- PHP v8.3
- Laravel v10.48
- Vite v5.1
- Vue v3.4
- Inertia v1.0
今回はNews(お知らせ)を題材にCRUDを作って登録や更新等の処理をみていきます。
Laravelのstarter kitsで簡単に使い始めることができるが、今回は敢えて個別でインストールする方法を取ってみます。
準備
sailでの開発環境を準備
2024年3月時点では、Laravel11がリリースされているため、今までの記事で使用していたcurl -s https://laravel.build/プロジェクト名 | bashでプロジェクトを作るとLaravel11のプロジェクトができてしまいます。
Laravel10とLaravel11ではディレクトリ構成の刷新など変更された箇所が数多くあるため、以下の手順でLaravel10のプロジェクトを作って進めていきます。
Upgrade Guide – Laravel 11.x – The PHP Framework For Web Artisans
composer create-project laravel/laravel myFirstInertia --prefer-dist "10.*"
cd myFirstInertia
composer require laravel/sail --dev
php artisan sail:install
sail up -d
モデル、マイグレーションの準備
sail php artisan make:model News -m# database/migrations/YYYY_MM_DD_150935_create_news_table.php
return new class extends Migration
{
public function up(): void
{
Schema::create('fugas', function (Blueprint $table) {
$table->id();
$table->string('title'); //←追加
$table->text('body'); //←追加
$table->timestamps();
});
}# app/Models/News.php
class News extends Model
{
use HasFactory;
// ↓以下4行追加
protected $fillable = [
'title',
'body',
];
...省略...sail php artisan migratetikerで適当なデータを5つ程入れておきます。
sail tinker

> News::create(['title'=>'a','body'=>'a'])
= App\Models\News {#6058
    title: "a",
    body: "a",
    updated_at: "2024-03-28 11:20:30",
    created_at: "2024-03-28 11:20:30",
    id: 1,
  }
> News::create(['title'=>'a','body'=>'a'])
= App\Models\News {#6037
    title: "b",
    body: "b",
    updated_at: "2024-03-28 11:36:59",
    created_at: "2024-03-28 11:36:59",
    id: 2,
  }

...省略...
コントローラーの準備
sail php artisan make:controller NewsController --resource --model=Newsサーバーサイドの設定
公式に従ってサーバーサイドのInertiaの設定をしていきます。
参照:Server-side setup – Inertia.js
依存関係をインストール
sail composer require inertiajs/inertia-laravelルートテンプレートの作成
InertiaとLaravelでのプロジェクトは、デフォルトのルートテンプレートをapp.blade.phpとしています。
# resources/views/app.blade.php

<!DOCTYPE html>
<html>
  <head>
    <meta charset="utf-8" />
    <meta name="viewport" content="width=device-width, initial-scale=1.0, maximum-scale=1.0" />
    @vite('resources/js/app.js')
    @inertiaHead
  </head>
  <body>
    @inertia
  </body>
</html>
@inertiaHead
Inertiaを使用する上で必要なメタデータやリンク等を動的に挿入するタグ。@inertia
フロントエンドのエントリポイント作成のためのタグ。ここに アプリケーションのメインJavascriptファイル(app.js等)が読み込まれ実行される。
ミドルウェアの設定
artisanコマンドでHandleInertiaRequestsミドルウェアをアプリケーションに公開します。
sail php artisan inertia:middlewareミドルウェアが公開されたら、Webミドルウェアグループの最後に、 HandleInertiaRequestsミドルウェアを登録します。
# app/Http/Kernel.php

'web' => [
    // ...
    \App\Http\Middleware\HandleInertiaRequests::class,
],
レスポンスの作成
# app/Http/Controllers/NewsController.php

use Inertia\Inertia;

class NewsController extends Controller
{
    public function show(News $news)
    {
        return Inertia::render('News/Show', [
            'news' => $news,
        ]);
    }
}
クライアントサイドの設定
公式に従ってクライアントサイドのInertiaの設定をしていきます。
参照:Client-side setup – Inertia.js
ViteとVue3で実装。
Laravel10では、Viteが標準のフロントエンドビルドツールとして採用されておりプロジェクトを作成すると、Viteに関連する設定ファイルが初めから含まれています。
ViteのVueプラグインをインストール
@vitejs/plugin-vueをインストールすると、それ自体でVueを依存関係として持っているため、Vueも自動的にインストールされます。
参照:Asset Bundling (Vite) – Laravel 10.x – The PHP Framework For Web Artisans
sail npm install @vitejs/plugin-vue --save-dev// vite.config.js
import { defineConfig } from 'vite';
import laravel from 'laravel-vite-plugin';
import vue from '@vitejs/plugin-vue'; //←追加
export default defineConfig({
plugins: [
vue(), //←追加
laravel({
input: ['resources/css/app.css', 'resources/js/app.js'],
refresh: true,
}),
],
});InertiaとVue3の依存関係のためのライブラリをインストール
sail npm install @inertiajs/vue3Inertiaアプリの初期化
// resources/js/app.js

import './bootstrap';

import { createApp, h } from 'vue'
import { createInertiaApp } from '@inertiajs/vue3'

createInertiaApp({
    resolve: (name) => {
        const pages = import.meta.glob("./Pages/**/*.vue", { eager: true });
        return pages[`./Pages/${name}.vue`];
    },
    setup({ el, App, props, plugin }) {
        createApp({ render: () => h(App, props) })
            .use(plugin)
            .mount(el);
    },
});
resolve
ページコンポーネントの名前を受け取り、対応するVueコンポーネントを返す。ここではimport.meta.globを使用して、./Pages/ 内の全Vueファイルを動的にインポートして返している。setup
アプリケーションが起動する際に呼び出される。resolveで返されるコンポーネントを現在のページとしてレンダリングする。従来のVueアプリケーションで App.vue が固定のルートコンポーネントとして機能するのとは異なり、現在のルートに応じてルートコンポーネントが動的に変わる。
コンポーネントの作成
<!-- resources/js/Pages/News/Show.vue -->

<template>
    <div>
        Hello World!
    </div>
</template>
フロントエンドの開発サーバーを起動してアクセス
sail npm run dev- http://localhost/news/1

CRUDの実装
共通の設定
CRUD用のルートに修正します。
# routes/web.php

use Illuminate\Support\Facades\Route;
use Inertia\Inertia;
use App\Http\Controllers\NewsController; //←追加

Route::get('/', function () {
    return view('welcome');
});

// ↓削除
// Route::get('/news/{news}', function () {
//     return Inertia::render('News/Show');
// });

// ↓以下6行追加
Route::resource('news', NewsController::class)
    ->except(['store', 'update']);
Route::post('news/create', [NewsController::class, 'store'])
    ->name('news.store');
Route::put('news/{news}/edit', [NewsController::class, 'update'])
    ->name('news.update');
resource
以下のルートを作成してくれる。
参照:Laravel 10.x コントローラ動詞 URI アクション ルート名 GET /newsindex news.index GET /news/createcreate news.create POST /newsstore news.store GET /news/{news}show news.show GET /news/{news}/editedit news.edit PUT/PATCH /news/{news}update news.update DELETE /news/{news}destroy news.destroy Route::post('news/create',、Route::put('news/{news}/edit',
store と update を除外して別途ルートを設定している。sailでの開発環境でvalidationエラー時に、元いた画面ではなく news.index にリダイレクトされてしまい、どうしても期待通りに動かなかった。なぜこうなるか、有識者の方教えてくださると幸いです。
表の store と update のURI部分が以下のように変更される。動詞 URI アクション ルート名 POST /news/createstore news.store PUT/PATCH /news/{news}/editupdate news.update
Ziggyをインストールする。公式によると、
Ziggy provides a JavaScript route() function that works like Laravel’s, making it a breeze to use your named Laravel routes in JavaScript.
Laravelのroute()と同じように動作するJavascriptのRoute()関数を提供しており、Javascriptで名前付きのLaravelルートを簡単に使用できるようになる、とのこと。
ZiggyもLaravelのstarter kitsでプロジェクトを作ると元からインストールされているが、今回は個別でインストールします。
sail composer require tightenco/ziggy# resources/views/app.blade.php
<!DOCTYPE html>
<html>
<head>
<meta charset="utf-8" />
<meta name="viewport" content="width=device-width, initial-scale=1.0, maximum-scale=1.0" />
@vite('resources/js/app.js')
@routes //←追加
@inertiaHead
</head>
<body>
@inertia
</body>
</html>// vite.config.js
import { defineConfig } from 'vite';
import laravel from 'laravel-vite-plugin';
import vue from '@vitejs/plugin-vue';
import path from 'path'; //←追加
export default defineConfig({
// ↓5行追加
resolve: {
alias: {
'ziggy-js': path.resolve('vendor/tightenco/ziggy'),
}
},
plugins: [
vue(),
laravel({
input: ['resources/css/app.css', 'resources/js/app.js'],
refresh: true,
}),
],
});// resources/js/app.js
import './bootstrap';
import { createApp, h } from 'vue'
import { createInertiaApp } from '@inertiajs/vue3'
import { ZiggyVue } from 'ziggy-js'; //←追加
createInertiaApp({
resolve: (name) => {
const pages = import.meta.glob("./Pages/**/*.vue", { eager: true });
return pages[`./Pages/${name}.vue`];
},
setup({ el, App, props, plugin }) {
createApp({ render: () => h(App, props) })
.use(plugin)
.use(ZiggyVue) //←追加
.mount(el);
},
});Read
一覧画面と詳細画面とそのそれぞれの処理を追加していきます。
# app/Http/Controllers/NewsController.php

class NewsController extends Controller
{

    public function index()
    {
        $news = News::all();
        return Inertia::render('News/Index', [
            'news' => $news,
        ]);
    }

    ...省略...

    public function show(News $news)
    {
        return Inertia::render('News/Show', [
            'news' => $news,
        ]);
    }

...省略...defineProps()でサーバーサイドから渡されたプロパティをコンポーネントで定義し、アクセスできるようにします。
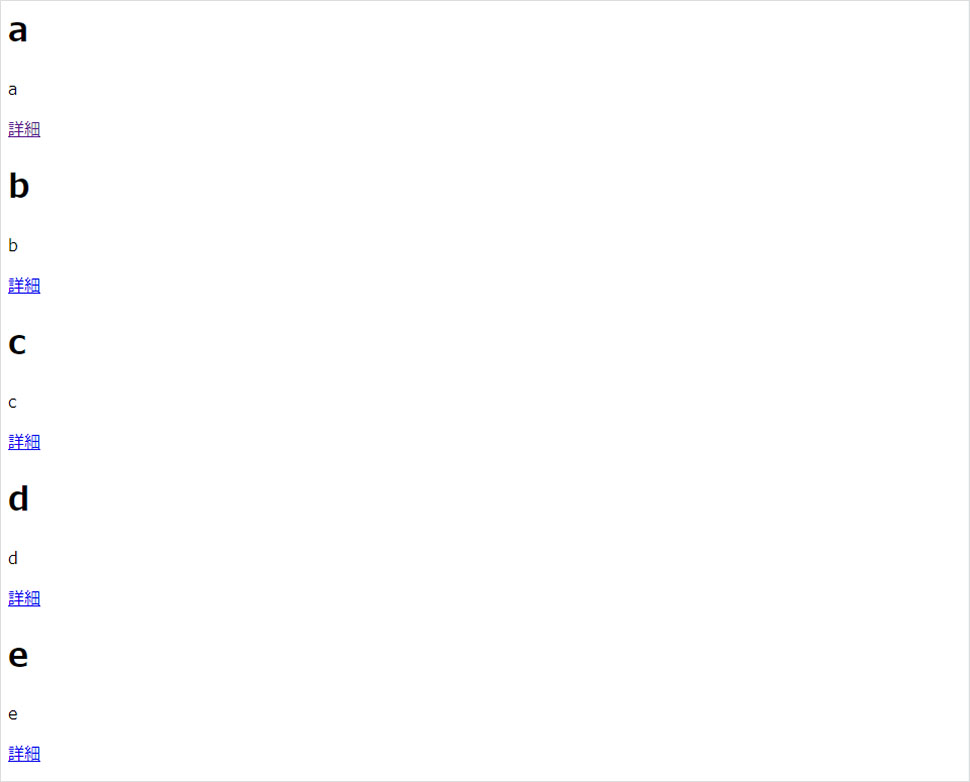
<!-- resources/js/Pages/News/Index.vue -->
<script setup>
import { Link } from '@inertiajs/vue3'
defineProps({
news: Object,
})
</script>
<template>
<div v-if="news">
<div v-for="n in news">
<h1>{{ n.title }}</h1>
<p>{{ n.body }}</p>
<Link :href="route('news.show', n)">詳細</Link>
</div>
</div>
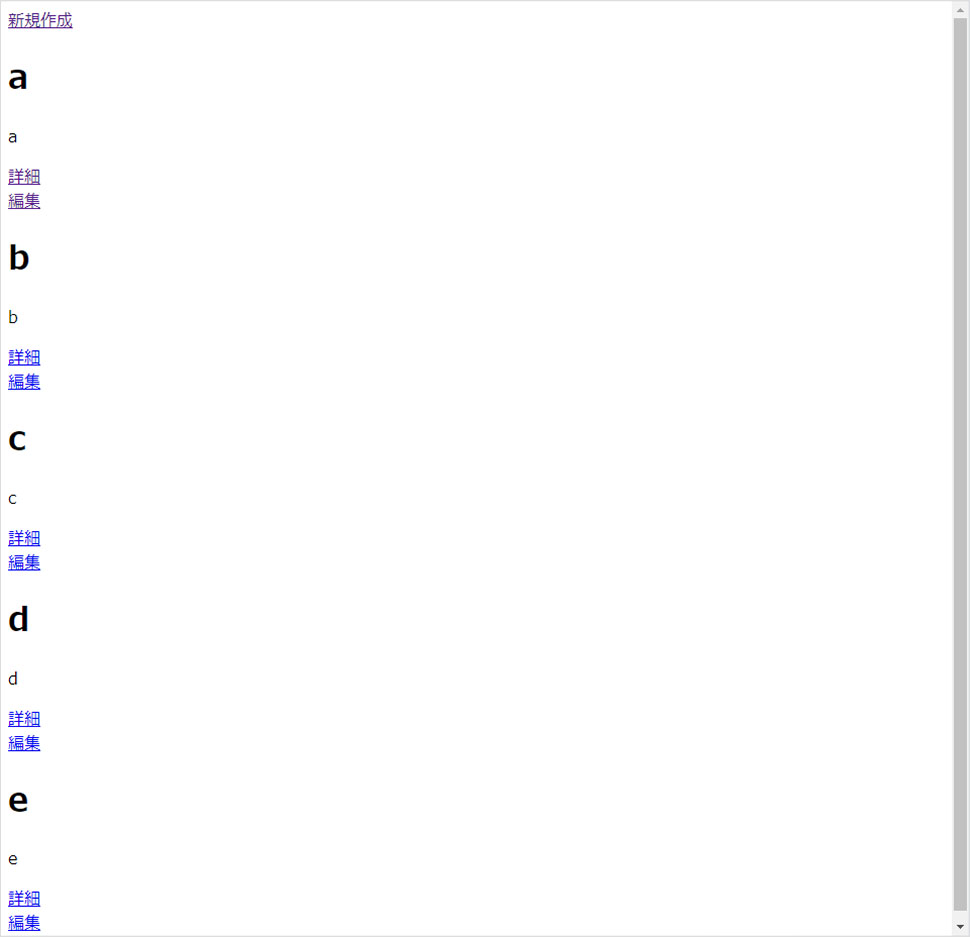
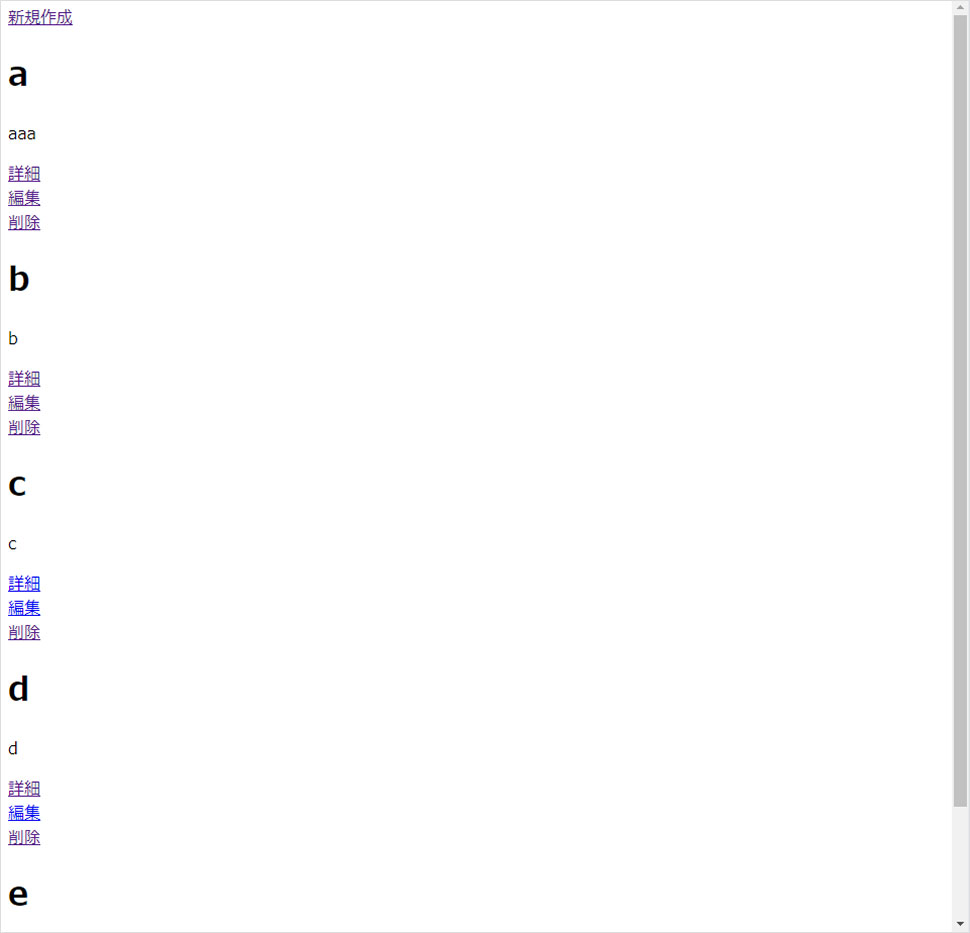
</template>- http://localhost/news
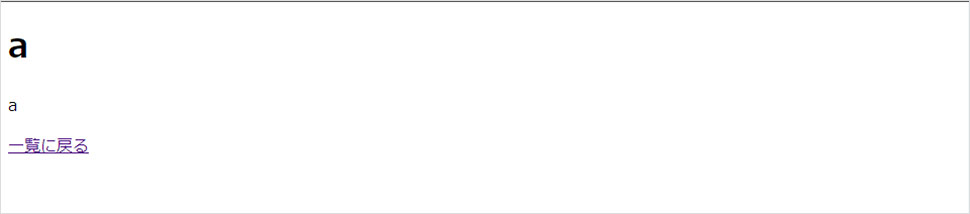
<!-- resources/js/Pages/News/Show.vue -->

<script setup>
import { Link } from '@inertiajs/vue3';

defineProps({
    news: Object,
})
</script>

<template>

    <div>
        <h1>{{ news.title }}</h1>
        <p>{{ news.body }}</p>
    </div>
    <Link :href="route('news.index')">一覧に戻る</Link>

</template>- http://localhost/news/1
Create
新規作成画面とその処理を追加します。
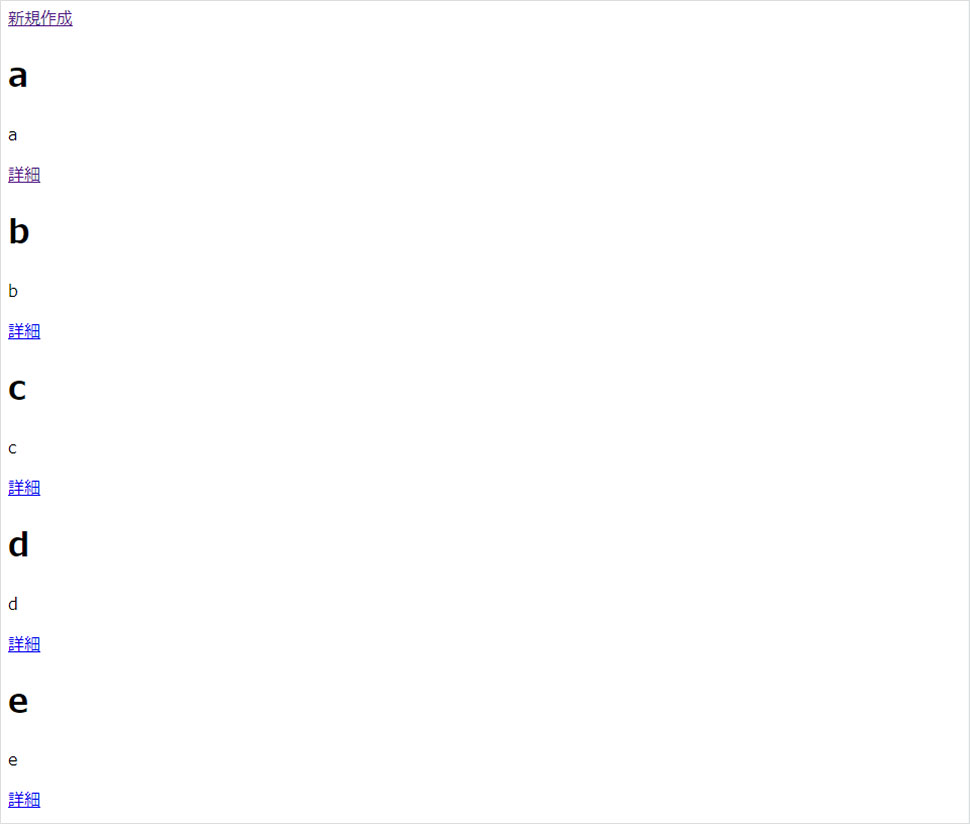
一覧画面に新規作成画面へのリンクを追加します。
<!-- resources/js/Pages/News/Index.vue -->
<script>
...省略...
</script>

<template>
    <Link :href="route('news.create')">新規作成</Link> <!-- ←追加 -->
    <div v-if="news">
        <div v-for="n in news">
            <h1>{{ n.title }}</h1>
            <p>{{ n.body }}</p>
            <Link :href="route('news.show', n)">詳細</Link>
        </div>
    </div>
</template>
# app/Http/Controllers/NewsController.php
class NewsController extends Controller
{
...省略...
public function create()
{
return Inertia::render('News/Create', []);
}
public function store(Request $request)
{
$validated = $request->validate([
'title' => ['required'],
'body' => ['required'],
]);
News::create($validated);
return redirect()->route('news.index');
}
...省略...useForm()はフォームヘルパーで一般的なフォーム送信の処理に必要な定型コードの量を減らした上でformリクエストを作成できます。
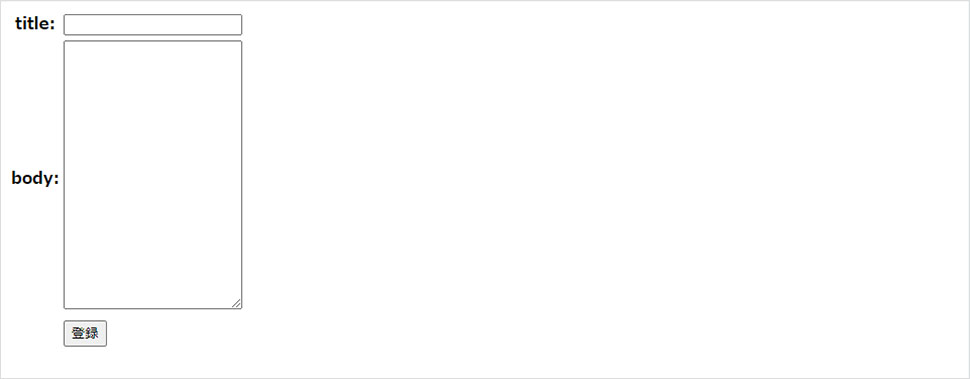
<!-- resources/js/Pages/News/Create.vue -->

<script setup>
import { useForm } from '@inertiajs/vue3'

const form = useForm({
    title: null,
    body: null,
})

const submit = () => {
    form.post(route('news.store'));
}
</script>

<template>
    <form @submit.prevent="submit">
        <table>
            <tr>
                <th><label for="title">title:</label></th>
                <td>
                    <div v-if="form.errors.title">{{ form.errors.title }}</div>
                    <input id="title" type="text" v-model="form.title">
                </td>
            </tr>
            <tr>
                <th><label for="body">body:</label></th>
                <td>
                    <div v-if="form.errors.body">{{ form.errors.body }}</div>
                    <textarea id="body" cols="22" rows="20" v-model="form.body"></textarea>
                </td>
            </tr>
            <tr>
                <th></th>
                <td>
                    <button type="submit" :disabled="form.processing">登録</button>
                </td>
            </tr>
        </table>
    </form>
</template>- http://localhost/news
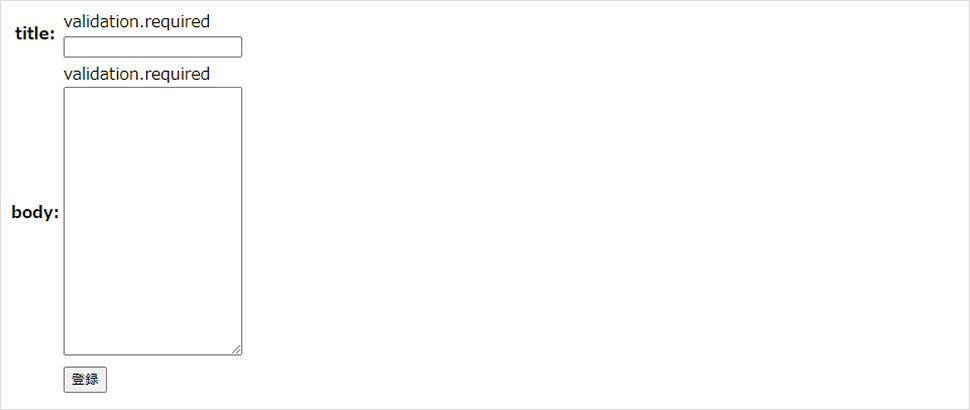
- http://localhost/news/create
バリデーションも確認。
Update
編集画面とその処理を追加します。
一覧画面に編集画面へのリンクを追加します。
<!-- resources/js/Pages/News/Index.vue -->
<script>
...省略...
</script>

<template>
    <Link :href="route('news.create')">新規作成</Link>
    <div v-if="news">
        <div v-for="n in news">
            <h1>{{ n.title }}</h1>
            <p>{{ n.body }}</p>
            <div>
                <Link :href="route('news.show', n)">詳細</Link>
            </div>
            <div>
                <Link :href="route('news.edit', n)">編集</Link> <!-- ←追加 -->
            </div>
        </div>
    </div>
</template>
# app/Http/Controllers/NewsController.php
class NewsController extends Controller
{
...省略...
public function edit(News $news)
{
return Inertia::render('News/Edit', [
'news' => $news,
]);
}
public function update(Request $request, News $news)
{
$validated = $request->validate([
'title' =>'required',
'body' => 'required',
]);
$news->update($validated);
return redirect()->route('news.index');
}
...省略...<!-- resources/js/Pages/News/Edit.vue -->
<script setup>
import { useForm } from '@inertiajs/vue3'
const props = defineProps({
news: Object,
})
const form = useForm({
title: props.news.title,
body: props.news.body,
})
const submit = () => {
form.put(route('news.update', props.news.id ))
}
</script>
<template>
<form @submit.prevent="submit">
<table>
<tr>
<th><label for="title">title:</label></th>
<td>
<div v-if="form.errors.title">{{ form.errors.title }}</div>
<input id="title" type="text" v-model="form.title">
</td>
</tr>
<tr>
<th><label for="body">body:</label></th>
<td>
<div v-if="form.errors.body">{{ form.errors.body }}</div>
<textarea id="body" cols="22" rows="20" v-model="form.body"></textarea>
</td>
</tr>
<tr>
<th></th>
<td>
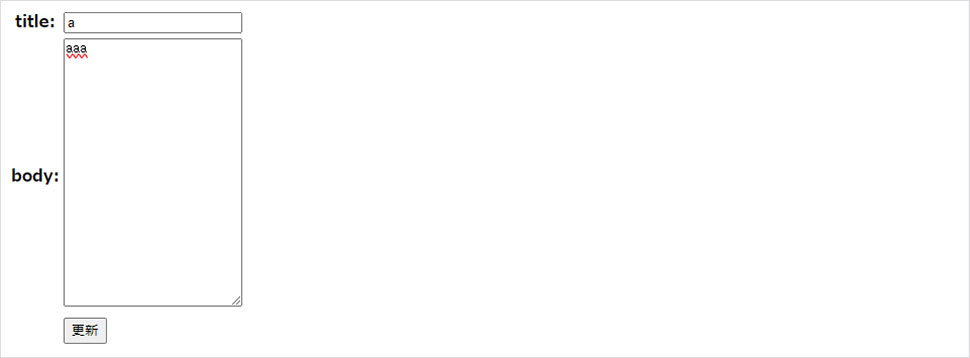
<button type="submit" :disabled="form.processing">更新</button>
</td>
</tr>
</table>
</form>
</template>- http://localhost/news
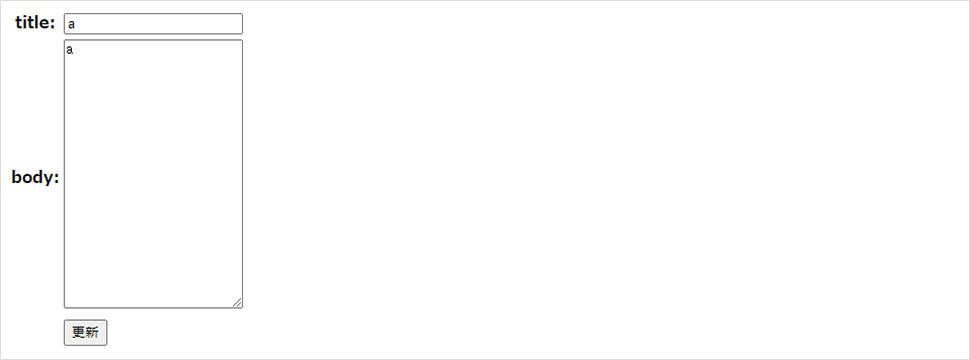
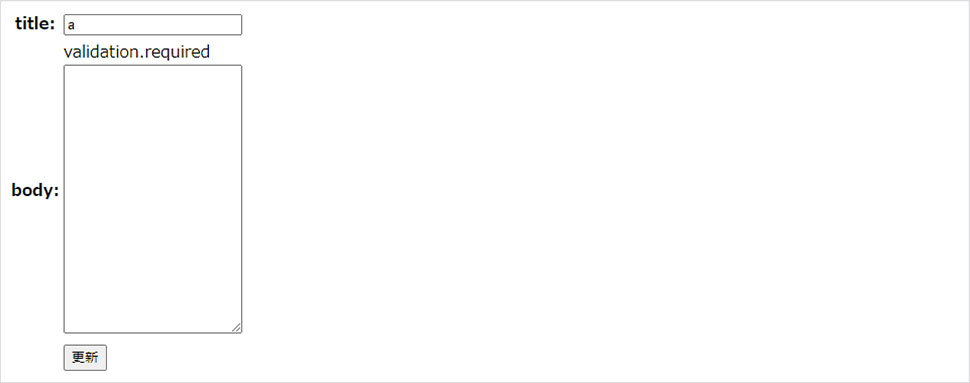
- http://localhost/news/1/edit
バリデーションも確認。
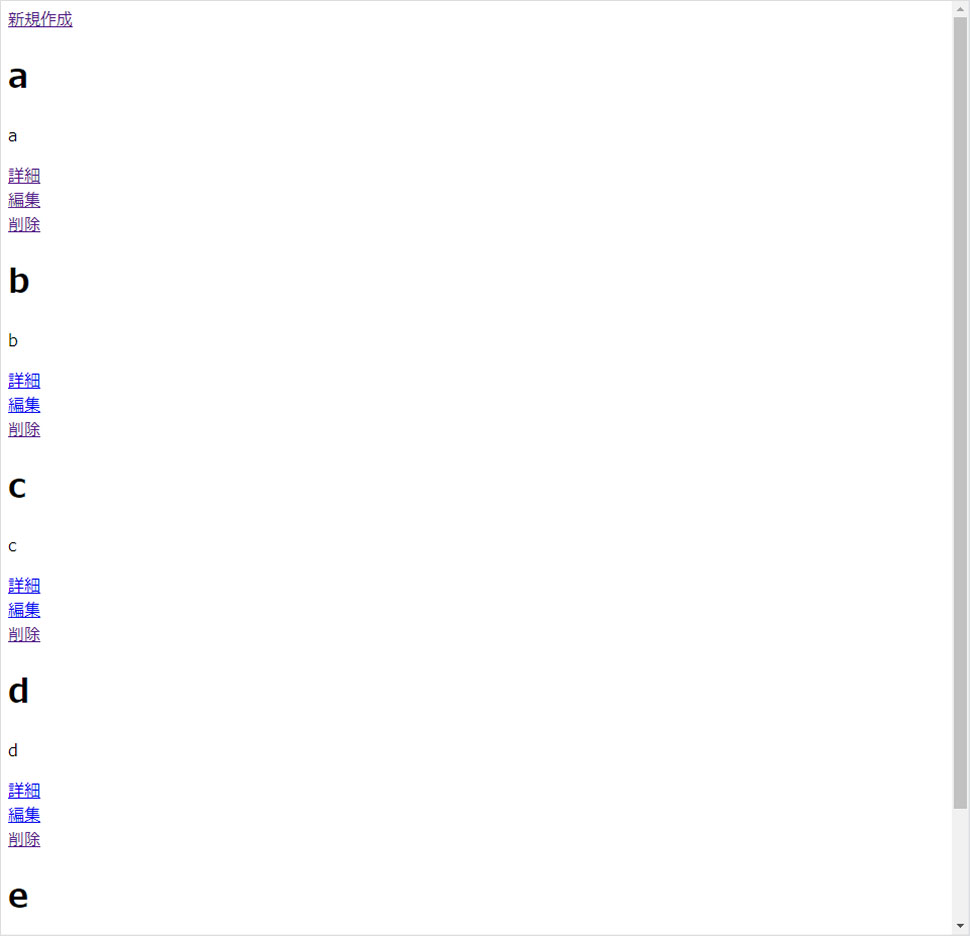
更新確認
Delete
# app/Http/Controllers/NewsController.php

class NewsController extends Controller
{
    public function destroy(News $news)
    {
        $news->delete();

        return redirect()->route('news.index')->with('message', 'News Deleted Successfully');
    }
<!-- resources/js/Pages/News/Index.vue -->
<script setup>
import { Link, useForm } from '@inertiajs/vue3' //←修正
defineProps({
news: Object,
})
// ↓以下6行追加
const form = useForm({});
const deleteNews = (news) => {
form.delete(route('news.destroy', news), {
preserveScroll: true,
})
}
</script>
<template>
<Link :href="route('news.create')">新規作成</Link>
<div v-if="news">
<div v-for="n in news">
<h1>{{ n.title }}</h1>
<p>{{ n.body }}</p>
<div>
<Link :href="route('news.show', n)">詳細</Link>
</div>
<div>
<Link :href="route('news.edit', n)">編集</Link>
</div>
<div>
<Link href="#" @click="deleteNews(n)">削除</Link> <!-- ←追加 -->
</div>
</div>
</div>
</template>preserveScroll
ページ間のナビゲーション時にデフォルトのブラウザ動作を模倣してスクロール位置をページの上部に自動的にリセットするのを無効にすることができる。
参照:Manual visits – Inertia.js
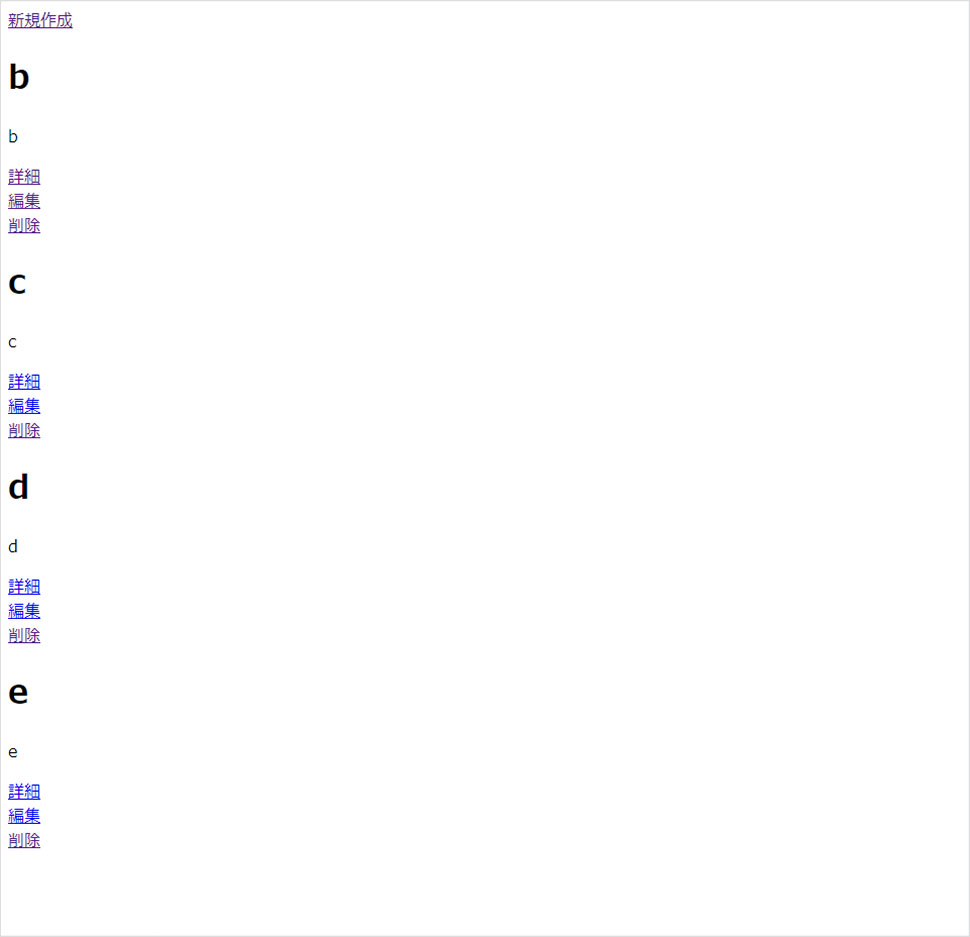
- http://localhost/news
削除を押して確認。
おわりに
いかがでしたでしょうか?
普段慣れ親しんだLaravelでのCRUDの実装とほぼ一緒な感じでSPAを実装することができました。これならフロントエンドに精通していないバックエンドエンジニアも非常に扱いやすいのではないでしょうか。個人的にも使いやすいと感じたので実際のプロジェクトに導入するのは全然ありだなと感じました。
では、また。
- Inertia.js – The Modern Monolith
- Asset Bundling (Vite) – Laravel 10.x – The PHP Framework For Web Artisans
- Laravel 10.x コントローラ
- How to setup Ziggy on Laravel/Inertija/Vite/Vue | by Dr. Adam Nielsen | Medium
- Laravel 9 & Vue 3をInertiaを用いて接続する(Vite使用版) #Laravel – Qiita
- Inertia.jsでシンプルにSPAを構築する Inertia入門#1 | SOHO MIND
この記事を書いた人

- ソリューション事業部 システムエンジニア
-
大学4年時春に文系就職を辞め、エンジニアになることを決意し、独学でRuby、Ruby on Railsを学習。
約1年間の独学期間を経てアーティスへWebエンジニアとして入社。現在はWebエンジニアとして、主にシステムの開発・運用に従事している。
抽象的なもの、複雑なものを言語化して文章にするのが好きで得意。
この執筆者の最新記事
- 2024年10月8日WEBVue3でjQueryのdatepickerを使いたい!実装手順と注意点を解説します。
- 2024年8月21日WEBVue3の非同期コンポーネントを使ってみる
- 2024年5月28日WEBLaravel×Inertia×Vue3でファイルアップロード機能を作ってみた
- 2024年4月15日WEBLaravel×Inertia×Vue3でCRUD機能を持つSPAを作ってみた
関連記事


最新記事


FOLLOW US
最新の情報をお届けします
- facebookでフォロー
- Twitterでフォロー
- Feedlyでフォロー