【Vue.js】コンポーネントの基本を理解して使ってみたい
新年あけましておめでとうございます。
前回の記事「【Vue.js】ドラッグ&ドロップでアップロードした画像をプレビュー表示してみる」で初めてVue.jsに関して書いてみましたが、新年早々、Vue.jsの特徴の1つでもあるコンポーネントの基礎について学習する機会がありました。
使い回しが出来たり、それにより品質を保てたり、保守性が高まったりと、とてもメリットが多いと言われているコンポーネントですが、なかなか筆者のようなフロントエンドを触り始めたばかりの人にはいまいちピンときませんよね。
また、装飾や動きを加えるイメージで、Javascriptをhtmlファイルに直接書きこむことに慣れている人には尚更とっつきにくい感じもしてます。(もちろん筆者もその1人です。。)
そこで今回は、コンポーネントの基本中の基本を1つずつ理解して、ハンズオン的に使っていけるようまとめてみました。
これからVue.jsを学習していきたい方は一読頂けると幸いです。
(個人的に2023年はフロントエンドに関する記事を書きたいなと思っています!!)
前提
- Vue.js2.7.1
容易に使えるCDN経由でVue.jsをインストール
後にVue3系CompositionAPIでVue2系との違いを理解しつつ書き直すため敢えてVue2系を使用 - VSCodeでLiveServerを使って挙動確認
- jsファイルに切り出さずに、htmlファイルに記述していく
本論
素のhtmlから始めて、それをコンポーネント化して、コンポーネントとルート間でのデータのやり取りを紹介していくという流れで理解していきます。
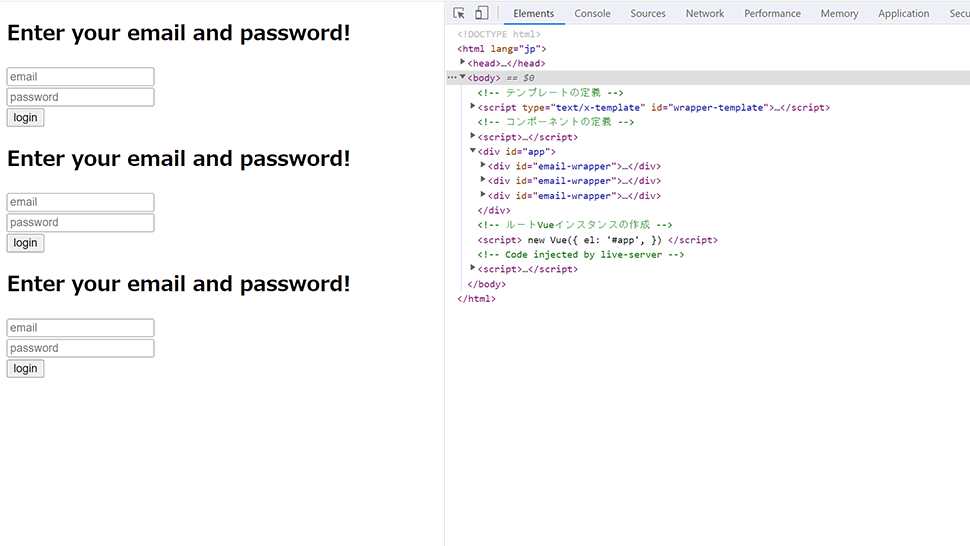
素のhtml
email-wrapper、twitter-wrapper、instagram-wrapperをid属性に持つ、それぞれのdivの塊を3つ用意します。
この3つで異なるところは、
- divのid属性 xxx-wrapper となっているxxx部分
- h2の your xxx and password! のxxx部分
- input type=”text” のplaceholder
<body>

    <div id="app">
        <div id="email-wrapper">
            <h2>Enter your email and password!</h2>
            <div>
                <input type="text" placeholder="email">
            </div>
            <div>
                <input type="password" placeholder="password">
            </div>
            <button>login</button>
        </div>

        <div id="twitter-wrapper">
            <h2>Enter your twitter and password!</h2>
            <div>
                <input type="text" placeholder="twitter">
            </div>
            <div>
                <input type="password" placeholder="password">
            </div>
            <button>login</button>
        </div>

        <div id="instagram-wrapper">
            <h2>Enter your instagram and password!</h2>
            <div>
                <input type="text" placeholder="instagram">
            </div>
            <div>
                <input type="password" placeholder="password">
            </div>
            <button>login</button>
        </div>
    </div>

</body>
VScodeのLiveServerで確認すると以下の通りです。

コンポーネント化する
追加内容は以下の通りです。
<コンポーネントテンプレート>
素のhtml段階では3つあったそれぞれのwrapperを1つにして、 script type=”text/x-template” を使ってコンポーネントテンプレートとして定義します。
scriptタグのidで定義した値を下のコンポーネント定義の際に指定して呼び出します。
<コンポーネント定義>
Vue.component(‘任意の付けたいコンポーネントの名前’, {オプション}) でコンポーネントを定義します。以下は{}内についてです。 template: ‘先ほど定義したコンポーネントテンプレートのid属性の値’ でコンポーネントテンプレートを指定して呼び出します。data(){ return {}} でUIの状態・データを返す関数として定義します。ここを data: {} とVueインスタンスでの定義のようにしないことに注意です。
<ルートテンプレート>
<wrapper-component></wrapper-component> のように、上の<コンポーネント定義>で付けたコンポーネントの名前をタグにして記述します。素のhtmlではwrapperが3つあったので3つ分タグを記述します。
<ルートVueインスタンス>
appが値のid属性を持つdivタグを元にVueインスタンスを定義します。
全体は以下の通りです。
<body>

    <!-- コンポーネントテンプレート -->
    <script type="text/x-template" id="wrapper-template">

        <div id='email-wrapper'>
            <h2>Enter your email and password!</h2>
            <div>
                <input type="text" placeholder="email">
            </div>
            <div>
                <input type="password" placeholder="password">
            </div>
            <button>login</button>
        </div>

    </script>

    <!-- コンポーネント定義 -->
    <script>
        Vue.component('wrapper-component', {
            template: '#wrapper-template',
            data() {
                return {
                    account: '',
                    password: '',
                }
            },
        })
    </script>

    <!-- ルートテンプレート -->
    <div id="app">
        <wrapper-component></wrapper-component>
        <wrapper-component></wrapper-component>
        <wrapper-component></wrapper-component>
    </div>

    <!-- ルートVueインスタンス -->
    <script>
        new Vue({
            el: '#app',
        })
    </script>

</body>
VScodeのLiveServerで確認すると以下の通りです。
3つのdivの塊を表示することはできましたが、下記問題点が生じました。
- それぞれの見出しが「Enter your email and password」、「Enter your twitter and password」、「Enter your instagram and password」となって欲しいが、全て「Enter your email and password」になっている
- それぞれの1つめの入力欄のplaceholderがそれぞれ「email」、「twitter」、「instagram」となって欲しいが、全て「email」になっている
- デベロッパーツールでソースを確認すると「email-wrapper」、「twitter-wrapper」、「instagram-wrapper」となって欲しいが、全て「email-wrapper」になっている
親子コンポーネントでのやり取り(親→子のprops)
上記の問題点を解決するために、propsを使います。
「Vue.js入門 基礎から実践アプリケーション開発まで」によると、
親コンポーネントから子コンポーネントへデータを渡すには、propsオプションを利用します。propsはコンポーネントがインスタンス化したときにオブジェクトのプロパティとして利用できます。dataなどと同じくテンプレート中で展開できるということです。
だそうです。修正内容は以下の通りです。
<ルートテンプレート>
37行目以降でaccount-format=”email”、account-format=”twitter”、account-format=”instagram”と追記。
<コンポーネント定義>
29行目以降にて props: [‘accountFormat’] と追記。
<コンポーネントテンプレート>
6行目のid属性はv-bindさせて以下のように追記。(こちらの書き方の詳細はVueのテンプレートのv-bind内でもJavaScriptのテンプレートリテラルが使えた – GAミント至上主義を参考に)
:id='`${accountFormat}-wrapper`'7行目には {{ accountFormat }} と追記。
9行目には :placeholder=”accountFormat” と追記。
これで、上記の問題点を解決できたのではないでしょうか。
全体は以下の通りです。
<body>
<!-- コンポーネントテンプレート -->
<script type="text/x-template" id="wrapper-template">
<div :id='`${accountFormat}-wrapper`'>
<h2>Enter your {{ accountFormat }} and password!</h2>
<div>
<input type="text" :placeholder="accountFormat">
</div>
<div>
<input type="password" placeholder="password">
</div>
<button>login</button>
</div>
</script>
<!-- コンポーネント定義 -->
<script>
Vue.component('wrapper-component', {
template: '#wrapper-template',
data() {
return {
account: '',
password: '',
}
},
props: [
'accountFormat'
],
})
</script>
<!-- ルートテンプレート -->
<div id="app">
<wrapper-component account-format="email"></wrapper-component>
<wrapper-component account-format="twitter"></wrapper-component>
<wrapper-component account-format="instagram"></wrapper-component>
</div>
<!-- ルートVueインスタンス -->
<script>
new Vue({
el: '#app',
})
</script>
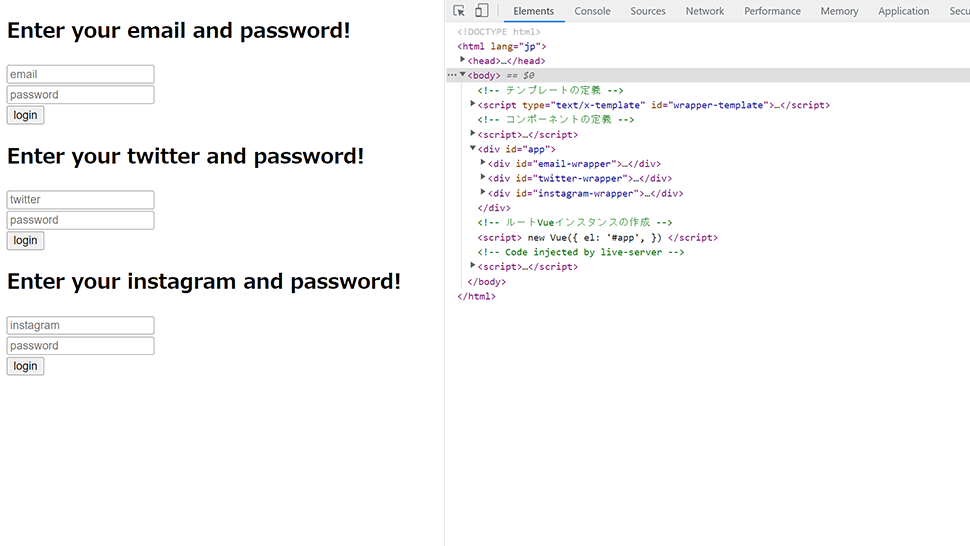
</body>VScodeのLiveServerで確認すると以下の通りです。
- それぞれの見出しが「Enter your email and password」、「Enter your twitter and password」、「Enter your instagram and password」になっている
- それぞれの1つめの入力欄のplaceholderがそれぞれ「email」、「twitter」、「instagram」になっている
- デベロッパーツールでソースを確認すると「email-wrapper」、「twitter-wrapper」、「instagram-wrapper」となっている
コンポーネントでのやり取り(子→親のemit)
続いてログイン情報を入力した後に、どのアカウントタイプでログインしようとしたか、ID / Passwordが入力されたかを知らせてくれるalertを出そうと考えました。
しかし、それぞれのコンポーネントが入力を受け取ってalertを出すのはルートにしようとすると、それぞれのコンポーネントからデータを渡さないといけないです。
そこで使うのがカスタムイベントで$emitというものです。
追加内容は以下の通りです。
<コンポーネント定義>
32行目以降に下記追記。
methods: {
    clickEvent() {
        let data = {
            accountFormat: this.accountFormat,
            account: this.account,
            password: this.password,
        }
        this.$emit('login-event', data);
    },
},data変数で複数の値を渡したいので、オブジェクトにします。
<コンポーネントテンプレート>
14行目に下記追記。
@click="clickEvent"clickEventメソッドを発火させます。
<ルートテンプレート>
47行目以降に下記追記。
@login-event="login"コンポーネント定義部分での$emitで作成されるカスタムイベントを受けとり、loginメソッドを発火させます。
<ルートVueインスタンス>
56行目以降に下記追記。
methods: {
    login(data) {
        window.alert('You will enter with ' + data.accountFormat + "-account !! \n" + 'account: ' + data.account + "\n" + 'password: ' + data.password);
    }
},
loginメソッドでコンポーネントから受けとったデータをalert内に表示させます。
全体はこんな感じです。
<body>

    <!-- コンポーネントテンプレート -->
    <script type="text/x-template" id="wrapper-template">

        <div :id='`${accountFormat}-wrapper`'>
            <h2>Enter your {{ accountFormat }} and password!</h2>
            <div>
                <input type="text" :placeholder="accountFormat" v-model="account">
            </div>
            <div>
                <input type="password" placeholder="password" v-model="password">
            </div>
            <button @click="clickEvent">login</button>
        </div>

    </script>

    <!-- コンポーネント定義 -->
    <script>
        Vue.component('wrapper-component', {
            template: '#wrapper-template',
            data() {
                return {
                    account: '',
                    password: '',
                }
            },
            props: [
                'accountFormat'
            ],
            methods: {
                clickEvent() {
                    let data = {
                        accountFormat: this.accountFormat,
                        account: this.account,
                        password: this.password,
                    }
                    this.$emit('login-event', data);
                },
            },
        })
    </script>

    <!-- ルートテンプレート -->
    <div id="app">
        <wrapper-component account-format="email" @login-event="login"></wrapper-component>
        <wrapper-component account-format="twitter" @login-event="login"></wrapper-component>
        <wrapper-component account-format="instagram" @login-event="login"></wrapper-component>
    </div>

    <!-- ルートVueインスタンス -->
    <script>
        new Vue({
            el: '#app',
            methods: {
                login(data) {
                    window.alert('You will enter with ' + data.accountFormat + "-account !! \n" + 'account: ' + data.account + "\n" + 'password: ' + data.password);
                }
            },
        })
    </script>

</body>
VScodeのLiveServerで確認すると以下の通りです。
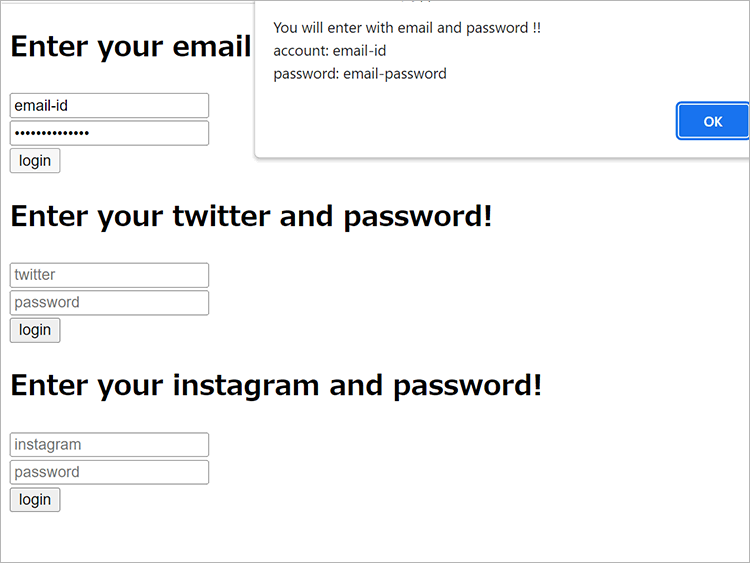
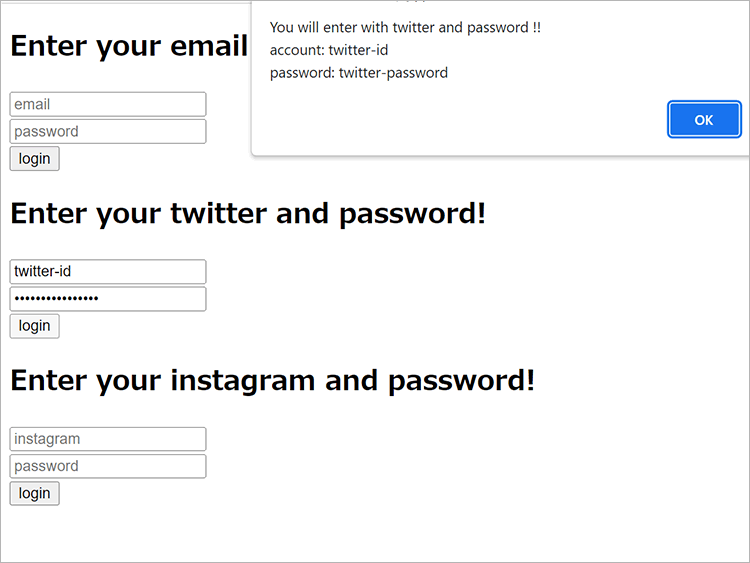
alertの中の文言がそれぞれ、
- emailタイプには email-account、email-id、email-password
- twitterタイプには twitter-account、twitter-id、twitter-password
- instagramタイプには instagram-account、instagram-id、instagram-password
と表示されています。

おわりに
いかがでしょうか?
他にもHTML を含む任意のテンプレートを入れることができるslot等の知識があるのですが、記事が長くなりすぎるので今回は割愛しました。
単純なコンポーネント化から始めて、propsや$emitを紹介しましたが、少しでもVue.jsのコンポーネントの基本の理解の助けとなれれば幸いです。
今回はCDN経由での利用だったので、またの機会にCLI版をインストールして、がんがんvue拡張子ファイルを使ってコンポーネントを使っていく記事も書きたいと思います。
何事も徐々に着々と進めていければと思います。
この記事を書いた人

- ソリューション事業部 システムエンジニア
-
大学4年時春に文系就職を辞め、エンジニアになることを決意し、独学でRuby、Ruby on Railsを学習。
約1年間の独学期間を経てアーティスへWebエンジニアとして入社。現在はWebエンジニアとして、主にシステムの開発・運用に従事している。
抽象的なもの、複雑なものを言語化して文章にするのが好きで得意。
この執筆者の最新記事
- 2024年10月8日WEBVue3でjQueryのdatepickerを使いたい!実装手順と注意点を解説します。
- 2024年8月21日WEBVue3の非同期コンポーネントを使ってみる
- 2024年5月28日WEBLaravel×Inertia×Vue3でファイルアップロード機能を作ってみた
- 2024年4月15日WEBLaravel×Inertia×Vue3でCRUD機能を持つSPAを作ってみた
関連記事


最新記事


FOLLOW US
最新の情報をお届けします
- facebookでフォロー
- Twitterでフォロー
- Feedlyでフォロー