GraphQLサーバを構築するためのGoライブラリ「gqlgen」を使ってGraphQLサーバーを構築してみる
こんにちは!
今回はGoでGraphQLサーバーを作ってみたくなったのでgqlgenを利用してGraphQLサーバーを構築してみます。
GraphQLとは
gqlgenとは
- スキーマファーストのアプローチに基づいています。
- 型安全を最優先します。
- コードの生成を可能にします。
GraphQLサーバーを構築してみる
gqlgenの公式にあるGetting Startedに沿ってサーバを構築してみます。
題材はTodoでtodoのリストを返す、todoを新しく作成する、終わったtodoをマークするを実装していきます。
完成版はvektah/gqlgen-tutorialsにあります
プロジェクトをセットアップします
$ mkdir gqlgen-todos
$ cd gqlgen-todos/
$ go mod init github.com/[username]/gqlgen-todos
go: creating new go.mod: module github.com/[username]/gqlgen-todos
次にtools.goを作成します。
//go:build tools
// +build tools

package tools

import (
	_ "github.com/99designs/gqlgen"
)
go mod tidyで依存するものをインストールします。
$ go mod tidy
go: finding module for package github.com/99designs/gqlgen
go: downloading github.com/99designs/gqlgen v0.17.20
go: found github.com/99designs/gqlgen in github.com/99designs/gqlgen v0.17.20
go: downloading github.com/urfave/cli/v2 v2.8.1
go: downloading golang.org/x/tools v0.1.12
go: downloading github.com/stretchr/testify v1.7.1
go: downloading github.com/vektah/gqlparser/v2 v2.5.1
go: downloading gopkg.in/yaml.v3 v3.0.1
go: downloading github.com/andreyvit/diff v0.0.0-20170406064948-c7f18ee00883
go: downloading github.com/gorilla/websocket v1.5.0
go: downloading github.com/mitchellh/mapstructure v1.3.1
go: downloading github.com/agnivade/levenshtein v1.1.1
go: downloading gopkg.in/yaml.v2 v2.4.0
go: downloading github.com/hashicorp/golang-lru v0.5.4
go: downloading gopkg.in/check.v1 v1.0.0-20190902080502-41f04d3bba15
go: downloading github.com/cpuguy83/go-md2man/v2 v2.0.1
go: downloading github.com/xrash/smetrics v0.0.0-20201216005158-039620a65673
go: downloading github.com/russross/blackfriday/v2 v2.1.0
go: downloading github.com/kr/pretty v0.1.0
go: downloading github.com/dgryski/trifles v0.0.0-20200323201526-dd97f9abfb48
go: downloading github.com/arbovm/levenshtein v0.0.0-20160628152529-48b4e1c0c4d0
go: downloading golang.org/x/sys v0.0.0-20220811171246-fbc7d0a398ab
go: downloading github.com/kr/text v0.1.0
これで最新版のgqlgenが追加されました。
サーバーを構築します
プロジェクトの雛型を作成します。
>$ go run github.com/99designs/gqlgen init
Creating gqlgen.yml
Creating graph/schema.graphqls
Creating server.go
Generating...

Exec "go run ./server.go" to start GraphQL server
上記コマンド実行後は以下のようなディレクトリ構成になります。
$ tree
.
├── go.mod
├── go.sum
├── gqlgen.yml             - gqlgenの構成ファイルです。生成されたコードを制御します。
├── graph
│   ├── generated          - 生成されたランタイムのみを含むパッケージ
│   │   └── generated.go
│   ├── model              - グラフモデル用のパッケージです。
│   │   └── models_gen.go
│   ├── resolver.go        - ルートグラフリゾルバタイプ。このファイルは再生成されません
│   ├── schema.graphqls    - スキーマ
│   └── schema.resolvers.go
├── server.go              - アプリのエントリーポイント
└── tools.go
次にスキーマを定義していきます。
gqlgenはスキーマファーストのライブラリなので、コードを書く前にGraphQL Schema Definition Languageを使用してAPIを記述します。
schema.graphqlsファイルに作成していきます。
ファイルを開いて見ると既にtodoの例が入っていました。
# GraphQL schema example
#
# https://gqlgen.com/getting-started/

type Todo {
  id: ID!
  text: String!
  done: Boolean!
  user: User!
}

type User {
  id: ID!
  name: String!
}

type Query {
  todos: [Todo!]!
}

input NewTodo {
  text: String!
  userId: String!
}

type Mutation {
  createTodo(input: NewTodo!): Todo!
}
次はリゾルバの実装です。 リゾルバはスキーマとデータソースを結びつける役割を持ちます。
(GraphQLの解析とリゾルバの雛形生成は、GraphQLのライブラリがやってくれます)
gqlgen の generate コマンドを実行すると、スキーマ ファイル (graph/schema.graphqls) がモデルのグラフ/モデル/* と比較され、可能な限りモデルに直接バインドされます。 これは、init が実行されたときに既に行われています。
ここでは、既に生成されたものを見てみます。
graph/schema.resolvers.go
package graph

// This file will be automatically regenerated based on the schema, any resolver implementations
// will be copied through when generating and any unknown code will be moved to the end.

import (
	"context"
	"fmt"

	"github.com/Mo3g4u/gqlgen-todos/graph/generated"
	"github.com/Mo3g4u/gqlgen-todos/graph/model"
)

// CreateTodo is the resolver for the createTodo field.
func (r *mutationResolver) CreateTodo(ctx context.Context, input model.NewTodo) (*model.Todo, error) {
	panic(fmt.Errorf("not implemented: CreateTodo - createTodo"))
}

// Todos is the resolver for the todos field.
func (r *queryResolver) Todos(ctx context.Context) ([]*model.Todo, error) {
	panic(fmt.Errorf("not implemented: Todos - todos"))
}

// Mutation returns generated.MutationResolver implementation.
func (r *Resolver) Mutation() generated.MutationResolver { return &mutationResolver{r} }

// Query returns generated.QueryResolver implementation.
func (r *Resolver) Query() generated.QueryResolver { return &queryResolver{r} }

type mutationResolver struct{ *Resolver }
type queryResolver struct{ *Resolver }
CreteTodoとTodosが実装されていないとなっています。
ではまず、状態を追跡する場所が必要です。
それをgraph/resolver.goに設定します。
graph/resolver.go ファイルは、データベースなどのアプリの依存関係を宣言する場所です。
グラフを作成すると、server.go で一度初期化されます。
graph/resolver.go
package graph

import "github.com/Mo3g4u/gqlgen-todos/graph/model"

// This file will not be regenerated automatically.
//
// It serves as dependency injection for your app, add any dependencies you require here.

type Resolver struct {
	todos []*model.Todo
}
graph/schema.resolvers.go に戻り、自動生成されたリゾルバ関数の本体を実装してみましょう。
CreateTodoについては、math.randパッケージを使用して、ランダムに生成されたIDを持つTodo を返し、それをインメモリのTodoリストに格納します。
実際のアプリでは、データベースやその他のバックエンドサービスを使用することになると思います。
graph/schema.resolvers.go
package graph

// This file will be automatically regenerated based on the schema, any resolver implementations
// will be copied through when generating and any unknown code will be moved to the end.

import (
	"context"
	"math/rand"
	"fmt"

	"github.com/Mo3g4u/gqlgen-todos/graph/generated"
	"github.com/Mo3g4u/gqlgen-todos/graph/model"
)

// CreateTodo is the resolver for the createTodo field.
func (r *mutationResolver) CreateTodo(ctx context.Context, input model.NewTodo) (*model.Todo, error) {
	todo := &model.Todo{
		Text: input.Text,
		ID:   fmt.Sprintf("T%d", rand.Int()),
		User: &model.User{ID: input.UserID, Name: "user " + input.UserID},
	}
	r.todos = append(r.todos, todo)
	return todo, nil
}

// Todos is the resolver for the todos field.
func (r *queryResolver) Todos(ctx context.Context) ([]*model.Todo, error) {
	return r.todos, nil
}

// Mutation returns generated.MutationResolver implementation.
func (r *Resolver) Mutation() generated.MutationResolver { return &mutationResolver{r} }

// Query returns generated.QueryResolver implementation.
func (r *Resolver) Query() generated.QueryResolver { return &queryResolver{r} }

type mutationResolver struct{ *Resolver }
type queryResolver struct{ *Resolver }
サーバーの実行
$ go run server.go
2022/10/14 16:03:03 connect to http://localhost:8080/ for GraphQL playground
ブラウザにアクセスすると以下が表示されます
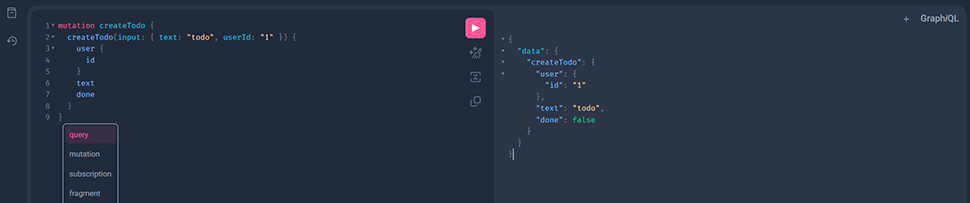
GraphQLのplaygroundが立ち上がったのでTodoの作成GraphQLクエリを実行してみます。
mutation createTodo {
  createTodo(input: { text: "todo", userId: "1" }) {
    user {
      id
    }
    text
    done
  }
}
次にTotosをクエリします。
query findTodos {
  todos {
    text
    done
    user {
      name
    }
  }
}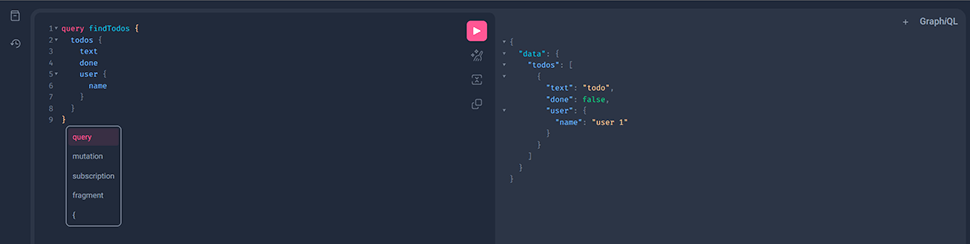
先ほど登録したtodoが表示されました。
GraphQLの特徴として、レスポンスのフィールドを指定できます。
そのためオーバフェッチ/アンダーフェッチを回避できます
オブジェクトのフェッチにはコストがかかります。
ユーザーが実際に要求しない限り、Todo にユーザーをロードしたくはありません。
そこで、生成されたTodoモデルをもう少し現実的なものに置き換えてみます。
gqlgenがカスタムモデルを見つけることができれば、それを生成するのではなく、使用できるようにするために、自動バインドを有効にします。
gqlgen.yml の autobind の設定行をアンコメントすることで行います。
# gqlgen will search for any type names in the schema in these go packages
# if they match it will use them, otherwise it will generate them.
autobind:
  - "github.com/Mo3g4u/gqlgen-todos/graph/model"
また、ユーザーフィールドのリゾルバを生成するために、gqlgen.ymlにTodoフィールドのリゾルバ設定を追加します。
Todo: から下を追加しています。
# This section declares type mapping between the GraphQL and go type systems
#
# The first line in each type will be used as defaults for resolver arguments and
# modelgen, the others will be allowed when binding to fields. Configure them to
# your liking
models:
  ID:
    model:
      - github.com/99designs/gqlgen/graphql.ID
      - github.com/99designs/gqlgen/graphql.Int
      - github.com/99designs/gqlgen/graphql.Int64
      - github.com/99designs/gqlgen/graphql.Int32
  Int:
    model:
      - github.com/99designs/gqlgen/graphql.Int
      - github.com/99designs/gqlgen/graphql.Int64
      - github.com/99designs/gqlgen/graphql.Int32
  Todo:
    fields:
      user:
resolver: truepackage model
type Todo struct {
ID string `json:"id"`
Text string `json:"text"`
Done bool `json:"done"`
UserID string `json:"userId"`
User *User `json:"user"`
}generateで再度生成します。
$ go run github.com/99designs/gqlgen generategraph/schema.resolvers.go に新しいリゾルバがあるので、これを実装して CreateTodo を修正しましょう。
// CreateTodo is the resolver for the createTodo field.
func (r *mutationResolver) CreateTodo(ctx context.Context, input model.NewTodo) (*model.Todo, error) {
	todo := &model.Todo{
		Text:   input.Text,
		ID:     fmt.Sprintf("T%d", rand.Int()),
		User:   &model.User{ID: input.UserID, Name: "user " + input.UserID},
		UserID: input.UserID,
	}
	r.todos = append(r.todos, todo)
	return todo, nil
}

// Todos is the resolver for the todos field.
func (r *queryResolver) Todos(ctx context.Context) ([]*model.Todo, error) {
	return r.todos, nil
}

// User is the resolver for the user field.
func (r *todoResolver) User(ctx context.Context, obj *model.Todo) (*model.User, error) {
	return &model.User{ID: obj.UserID, Name: "user " + obj.UserID}, nil
}
仕上げ
resolver.goの先頭、packageとimportの間に、以下の行を追加します。
//go:generate go run github.com/99designs/gqlgen generateこのコメントは、コードを再生成するときに実行するコマンドを go generate に伝えます。
プロジェクト全体に対して再帰的にgo generateを実行するには、このコマンドを使用します。
$ go generate ./...サーバーを実行して動作を試します。
$ go run server.go
2022/10/14 16:30:26 connect to http://localhost:8080/ for GraphQL playground
ここまでがGetting Startedの内容です。
gqlgenの公式には色々な情報があるのでGetting Startedを終えたらリファレンスやレシピを 読んでみると為になると思います。DatalodersでのN+1問題の解消やGinへの組み込み方法などがあります。
この記事を書いた人

- 創造性を最大限に発揮するとともに、インターネットに代表されるITを活用し、みんなの生活が便利で、豊かで、楽しいものになるようなサービスやコンテンツを考え、創り出し提供しています。
この執筆者の最新記事
関連記事


最新記事


FOLLOW US
最新の情報をお届けします
- facebookでフォロー
- Twitterでフォロー
- Feedlyでフォロー