Windowsで至高のターミナル生活を求めて(Alacritty編)

ターミナルのいい季節になってきた今日この頃。またお会いしましたね。前回の記事「Windowsで至高のターミナル生活を求めて(MSYS2編)」ではMSYS2をご紹介しました。
今回はクロスプラットフォームのGPUを使用する高速なターミナルエミュレーターが売りのRust製のAlacrittyをインストールから起動まで試してみました。
WindowsのコマンドラインインストーラーのScoopを使ってAlacrittyのインストールから起動までを行っていきます。
1. Scoopとは
- Permission popup windows
- GUI wizard-style installers
- Path pollution from installing lots of programs
- Unexpected side-effects from installing and uninstalling programs
- The need to find and install dependencies
- The need to perform extra setup steps to get a working program
WindowsにはChocolateyなどのパッケージマネージャーが存在しますが、その他のパッケージマネージャとの違いを公式Wikiにまとめられています。
レジストリをいじられることがないので気軽にインストールや削除を行えるのがうれしいポイントです。
2. Scoopのインストール
PowerShellを開いてクイックスタートの通りに進めていきます。
1. PowerShellにローカルスクリプトの実行を許可
PS> set-executionpolicy remotesigned -scope currentuser2. Scoopのインストール
PS> Invoke-Expression (New-Object System.Net.WebClient).DownloadString('https://get.scoop.sh')
Initializing...
Downloading scoop...
Extracting...
Creating shim...
Downloading main bucket...
Extracting...
Adding ~\scoop\shims to your path.
'lastupdate' has been set to '2020-07-01T11:17:02.8114646+09:00'
Scoop was installed successfully!
Type 'scoop help' for instructions.
Scoop経由でインストールしたパッケージはデフォルトでは C:\Users\\scoop\apps\ フォルダ以下に配置されます。
3. Scoop経由でAlacrittyをインストール
PowerShellから以下のコマンドを実行します。
PS> scoop bucket add extras
Checking repo... ok
The extras bucket was added successfully.
PS> scoop install alacritty
Installing 'alacritty' (0.4.3) [64bit]
Starting download with aria2 ...
Download: [#494820 0B/0B CN:1 DL:0B]
Download: [#494820 0B/1.9MiB(0%) CN:1 DL:0B]
Download: [#494820 1.2MiB/1.9MiB(68%) CN:1 DL:0.9MiB]
Download: Download Results:
Download: gid |stat|avg speed |path/URI
Download: ======+====+===========+=======================================================
Download: 494820|OK | 1.4MiB/s|C:/Users/artis/scoop/cache/alacritty#0.4.3#https_github.com_jwilm_alacritty_releases_download_v0.4.3_Alacritty-v0.4.3-windows-portable.zip
Download: Status Legend:
Download: (OK):download completed.
Checking hash of Alacritty-v0.4.3-windows-portable.zip ... ok.
Extracting Alacritty-v0.4.3-windows-portable.zip ... done.
Linking ~\scoop\apps\alacritty\current => ~\scoop\apps\alacritty\0.4.3
Creating shim for 'alacritty'.
Creating shortcut for Alacritty (alacritty.exe)
'alacritty' (0.4.3) was installed successfully!
'alacritty' suggests installing 'extras/vcredist2017'.Alacrittyのインストール結果の最後に extras/vcredist2017 がサジェストされています。
VisualC++を未インストールの方は scoop install extras/vcredist2017 VisualC++もインストールしましょう。
4. Alacrittyの設定
Alacrittyは以下のパスに設定ファイルを配置する事で設定変更が可能です。※1
%APPDATA%\alacritty\alacritty.ymlshell:
program: /Windows/System32/wsl.exe ~ -d Ubuntu-20.04
font:
normal:
family: Consolas
style: regular
# Colors (Hyper)
colors:
# Default colors
primary:
background: '0x000000'
foreground: '0xffffff'
cursor:
text: '0xF81CE5'
cursor: '0xffffff'
# Normal colors
normal:
black: '0x000000'
red: '0xfe0100'
green: '0x33ff00'
yellow: '0xfeff00'
blue: '0x0066ff'
magenta: '0xcc00ff'
cyan: '0x00ffff'
white: '0xd0d0d0'
# Bright colors
bright:
black: '0x808080'
red: '0xfe0100'
green: '0x33ff00'
yellow: '0xfeff00'
blue: '0x0066ff'
magenta: '0xcc00ff'
cyan: '0x00ffff'
white: '0xFFFFFF'
background_opacity: 0.95
mouse:
double_click: { threshold: 300 }
triple_click: { threshold: 300 }
hide_when_typing: false
mouse_bindings:
- { mouse: Left, mods: Shift, action: Copy }
- { mouse: Right, mods: Shift, action: Paste }設定ファイルの詳細は公式Wikiに記載されています。
フォントやカラースキーマの変更をしたい方は公式Wikiを参照しましょう。
5. Alacrittyの起動
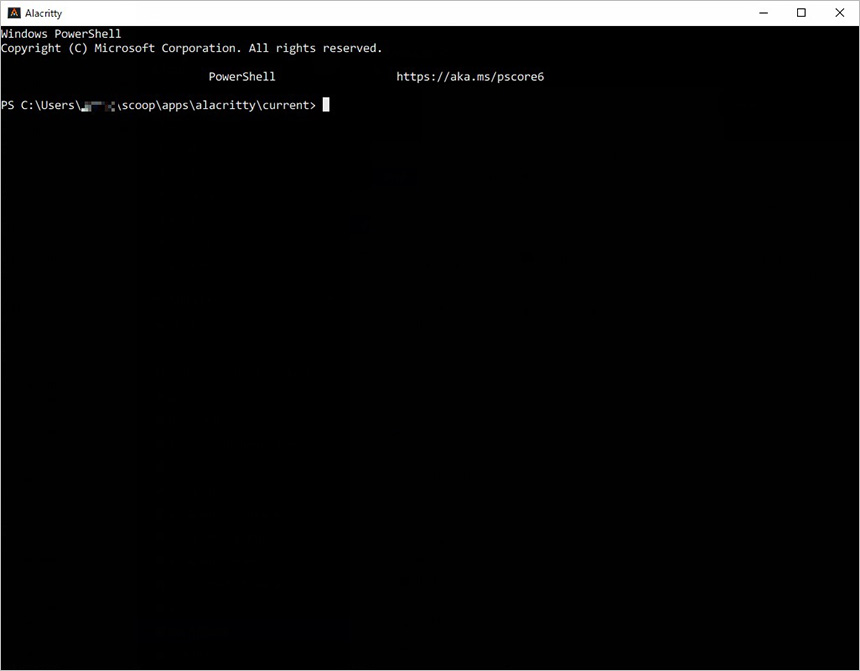
Alacrittyを起動します。 Scoop経由でインストールした実行バイナリは以下のフォルダに配置されます。
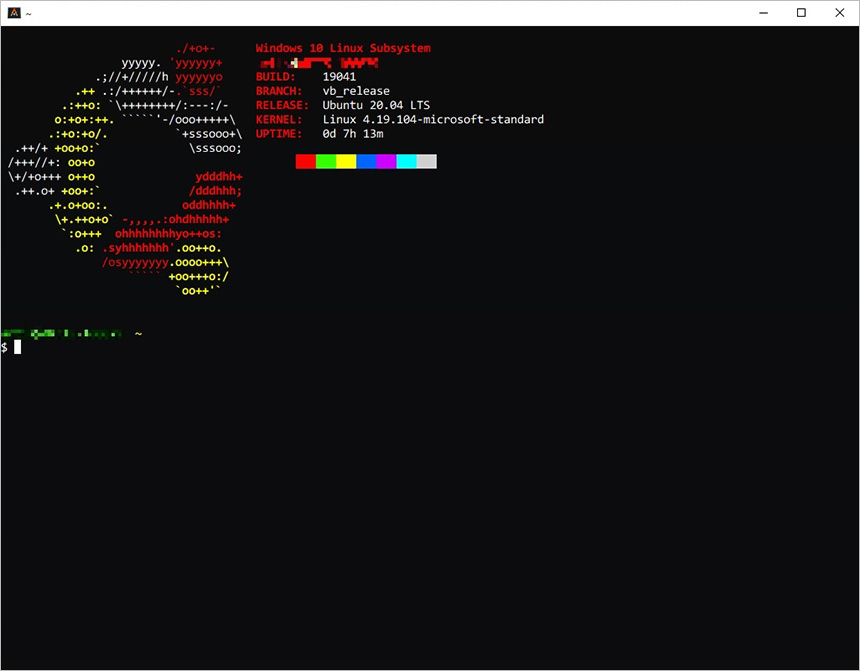
C:\Users\\scoop\apps\alacritty\current\alacritty.exe設定ファイルでWSLで起動する設定を追加しましたので、WSL2のUbuntu 20.04 LTSが起動されていることが確認できますね。
設定ファイルを配置せずにデフォルトの状態で起動する場合はPowerShellが起動します。
まとめ
Alacrittyのインストールから起動までをご紹介しました。
以前ご紹介したMSYS2と比べて体感で感じるほど実行速度は圧倒的に速いです。
ただ、日本語を入力中の変換候補が左上に出る症状があり筆者は導入を泣く泣く見送りました。
普段使いのターミナルとは別のものを探してる方は一度試してみてはいかがでしょうか。
※1 Win + r + shell:appsfolder 又は エクスプローラーに %APPDATA% をそのまま入力すると実際のパスに移動できます。
C:\Users\\AppData\Roamingこの記事を書いた人

- 事業開発部 web application engineer
- 2013年にアーティスに入社。システムエンジニアとしてアーティスCMSを使用したWebサイトや受託システムの構築・保守に携わる。環境構築が好き。
関連記事
最新記事


FOLLOW US
最新の情報をお届けします
- facebookでフォロー
- Twitterでフォロー
- Feedlyでフォロー